In This Article
Direct answer
A ground, buffed, centrifugally polished or plasma-electrolytically polished part may look bright while still carrying:
- polishing compound;
- abrasive and metal powder;
- cutting oil;
- mass-finishing compound;
- electrolyte;
- fixture contamination;
- fingerprints;
- cleaner residue;
- trapped liquid in blind holes and deep grooves.
Post-polishing cleaning must achieve three things:
remove original contamination
→ remove the cleaner and dispersed contamination
→ prevent new contamination during drying and handling
A stable route normally combines:
precleaning
→ material-compatible compound removal and degreasing
→ heated chemistry with ultrasonic action
→ directed spray and cavity flushing
→ multi-stage rinsing
→ pure-water final rinse
→ drainage and controlled drying
→ cleanliness inspection
→ protected transfer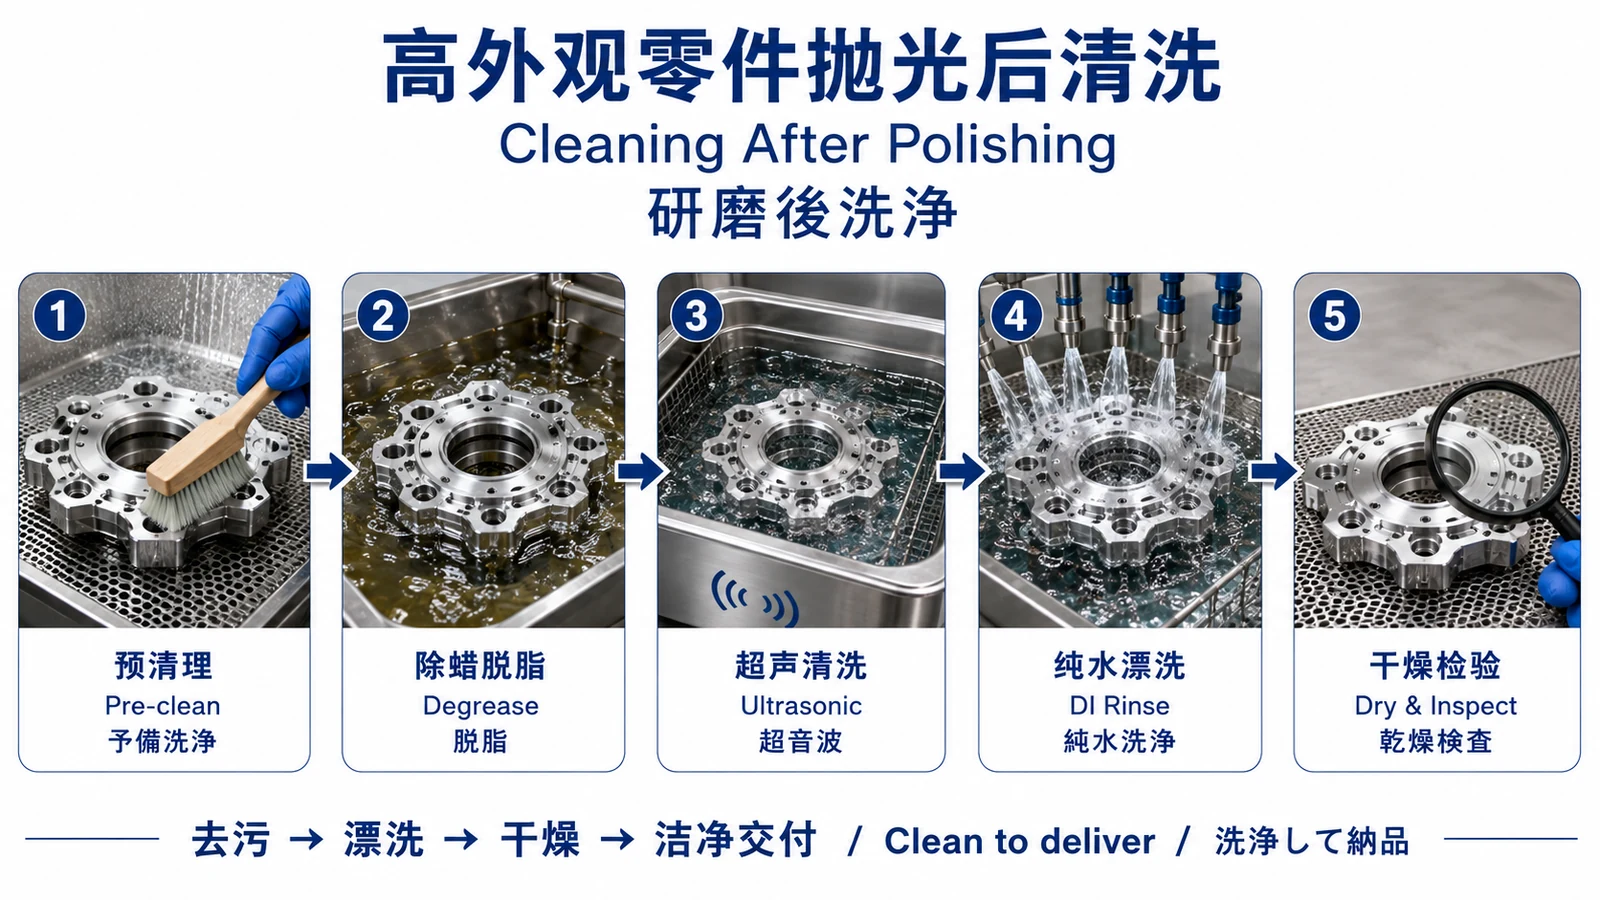
1. What is precision cleaning after grinding and polishing?
Precision cleaning after grinding and polishing removes fine particles and chemical residues generated by the workpiece, tooling, abrasive and polishing process so that the part can proceed to coating, assembly or inspection.
It differs from ordinary rinsing because:
- targets include contamination too small to see;
- thin oil films, compound films and chemical residue must be removed;
- the established gloss, texture and dimensions must not be damaged;
- grooves, blind holes and internal cavities must be controlled;
- the result must remain stable in the next process;
- cleaning equipment, bath, tools and handling must also be controlled.
Precision cleaning is an independent manufacturing operation, not a minor final step after polishing.
2. Why a bright surface can still be contaminated
Brightness indicates reflection, not cleanliness.
Examples include:
- a transparent or semi-transparent compound film;
- fine abrasive trapped in casting porosity;
- a uniform oil film that is difficult to see;
- electrolyte retained in a blind hole;
- cleaner that dries into a thin layer;
- fingerprints revealed only after PVD or anodizing;
- liquid that drains from a cavity after packaging.
Cleaning quality cannot be judged by brightness alone.
3. Typical post-polishing contamination
| Contamination | Main source | Typical risk |
|---|---|---|
| Polishing compound | Buffing | Craters, adhesion failure, water break |
| Abrasive particles | Robots, belts and hand grinding | Scratches, retained particles, coating defects |
| Metal powder | Grinding and polishing | Redeposition, cavity residue, foreign material |
| Centrifugal-finishing compound | Centrifugal finishing | Film, white residue, cavity contamination |
| Electrolyte | Plasma electrolytic polishing | Salt marks, corrosion, abnormal downstream reaction |
| Cutting oil | CNC machining | Uneven anodizing, coating craters, adhesion failure |
| Fingerprints and glove contamination | Inspection and handling | Local shade, PVD defects, corrosion prints |
| Cleaner residue | Inadequate rinsing | Water marks, tank contamination, coating defects |
| Minerals in ordinary water | Rinsing and drying | White spots, salt residue, uneven appearance |
Different contamination requires different removal mechanisms.
4. Why physical and chemical action must work together
Physical cleaning separates contamination from the surface and carries it away. Typical methods include:
- ultrasonics;
- high-pressure or directed spray;
- flowing rinse;
- brushing;
- rotation or part inversion;
- internal flushing.
Chemical cleaning acts on oil, compound and other contamination by:
- dissolving;
- softening;
- emulsifying;
- dispersing;
- reducing interfacial adhesion;
- reducing redeposition during cleaning and rinsing.
A stable process is:
chemistry changes the contamination
+
physical action separates it from the surface
+
rinsing removes contamination and chemistry from the part
One mechanism alone rarely handles broad faces, grooves, rough surfaces and internal cavities equally well.
5. Step one: preclean heavy compound and loose powder
Precleaning reduces loading on the main precision-cleaning bath.
Possible methods:
- local wiping;
- prespray;
- flowing-water rinse;
- dedicated brushes;
- preliminary softening of heavy compound;
- clean air or extraction for loose powder;
- directed preflush of grooves and holes.
Precleaning tools can themselves accumulate contamination. Control:
- sponge and brush replacement;
- whether different materials share tools;
- tool cleaning and storage;
- bench and basket cleanliness;
- separation between dirty precleaning and final clean transfer.
6. Step two: select compound removal and degreasing by material and soil
The objective is not the strongest chemistry. It is effective removal without damaging the material and appearance.
Consider:
- aluminum alloy;
- cast or wrought aluminum;
- zinc alloy;
- stainless steel;
- titanium alloy;
- already polished or brushed surfaces;
- downstream anodizing, painting, plating or PVD;
- whether the soil is compound, oil or a mixed residue.
Validate:
cleaner type
→ concentration
→ temperature
→ time
→ agitation or ultrasonics
→ material attack
→ gloss and color change
Sensitive materials such as aluminum and zinc can turn gray, lose gloss or pit when chemistry, temperature or time is excessive.
7. Step three: combine heated chemistry with ultrasonics
Within the material limit, heat can improve softening, emulsification and dispersion of some compounds and oils. Ultrasonics help detach contamination through fine vibration and liquid action.
Production controls include:
- bath temperature;
- cleaner concentration;
- treatment time;
- ultrasonic frequency and power;
- part position relative to transducers;
- loading density;
- basket design;
- trapped air in blind holes;
- part shadowing;
- bath contamination;
- filtration and bath-change interval.
A fixed cleaning time is not enough when the bath and load change.
8. Step four: add directed spray, cavity flushing and local brushing
Ultrasonics do not guarantee equal cleaning in every feature.
Critical structures include:
- blind holes;
- threaded holes;
- deep grooves;
- small internal corners;
- narrow gaps;
- layered structures;
- rough cast surfaces;
- orientations that do not drain naturally.
Supporting methods include:
- directed nozzles;
- internal flushing;
- part inversion;
- pulsed spray;
- local brushing;
- multiple immersion angles;
- reduced basket shadowing;
- longer effective flow in critical zones.
The goal is coverage of difficult regions, not simply higher overall cleaning intensity.
9. Step five: multi-stage rinsing and pure-water final rinse
After chemical cleaning, the part may still carry:
- cleaner;
- surfactant;
- emulsified compound;
- dispersed metal powder;
- contamination from the bath.
A suitable sequence is:
main cleaning bath
→ first rinse
→ second rinse
→ pure-water final rinse
Multi-stage rinsing:
- reduces chemical carryover;
- protects downstream rinse tanks;
- removes cleaner residue;
- reduces drying marks;
- reduces anodizing, painting and plating variation;
- stabilizes batch cleaning.
A pure-water final rinse does not automatically prove a specific cleanliness class. Water quality, bath state, carry-in and geometry still matter.
10. Step six: drainage and controlled drying
Rinsing is not the end of cleaning.
After withdrawal:
controlled withdrawal orientation
→ inversion and gravity drainage
→ cavity blow-off
→ controlled drying
→ cooling
→ visual reinspection after a defined time
Drying risks include:
- trapped liquid;
- water marks;
- white salt residue;
- local oxidation;
- oil or water in compressed air;
- discoloration from excessive heat;
- dust attracted to a wet surface.
Industry options include hot air, centrifugal spin drying, warm-water withdrawal and other dedicated systems. Selection depends on material, geometry, volume, safety and cleanliness requirements.
11. Why ultrasonic cleaning is not universal
Limits include:
- heavy and hardened compound needs pretreatment;
- trapped air can keep liquid out of blind holes;
- dense loading causes shadowing;
- a dirty bath causes redeposition;
- part position changes the effective action;
- sensitive glossy surfaces need validation;
- rinsing and drying are still required;
- ultrasonics cannot repair porosity, pits or substrate defects.
Ultrasonics are one physical tool in the cleaning chain, not a guarantee of cleanliness.
12. Batch cleaning versus single-part cleaning
| Method | Suitable use | Main advantage | Main risk |
|---|---|---|---|
| Batch tank cleaning | Similar parts and stable volume | High throughput and cost efficiency | Shadowing, contact damage and drainage variation |
| Divided-basket cleaning | Cosmetic small parts prone to damage | Reduces contact and controls orientation | Basket affects ultrasonic action and flow |
| Single-part spray | Large parts, complex cavities, critical zones | Conditions and direction are controllable | Cycle time and nozzle coverage |
| Dedicated single-part station | High requirement, low volume or special geometry | Part-specific confirmation | Cost and processing time |
| Inline continuous cleaning | Stable product and stable production route | Repeatable cycle and automation | Changeover and flexibility limits |
Selection must include class-A damage, cavity geometry, loading orientation, product changeover and downstream cleanliness.
13. Why tools, baths and baskets also need control
The cleaning system can become a contamination source.
Control:
- sponges and brushes;
- baskets;
- fixtures;
- filters;
- bath concentration;
- bath temperature;
- contamination load;
- bath-change interval;
- rinse-water state;
- sediment;
- cross-contamination between materials.
Production records should contain actual states that affect the result, not only “cleaned.”
14. Why different materials cannot use one parameter set
Aluminum alloys
Watch:
- alkaline etching and gray appearance;
- loss of gloss;
- microstructural difference in cast alloy;
- corrosion caused by retained liquid;
- compatibility with subsequent anodizing.
Zinc alloys
Watch:
- chemical sensitivity;
- discoloration;
- thin walls and cavities;
- subsequent plating or coating.
Stainless steel
Watch:
- polishing compound and oil;
- foreign iron contamination;
- water marks;
- subsequent passivation, PVD or assembly.
Titanium alloys
Watch:
- surface condition;
- cleaner compatibility;
- fingerprints and oil;
- downstream anodizing or PVD.
The same material with a different base finish can also require different conditions.
15. Where secondary contamination comes from
Typical sources:
- bare-hand contact;
- dirty gloves;
- contaminated fixtures;
- benches;
- totes;
- packaging;
- oil and water in compressed air;
- polishing dust;
- repeated inspection handling;
- long exposure after cleaning.
Controls include:
- suitable gloves;
- contact only on non-cosmetic regions;
- clean fixtures and transfer containers;
- separation of polishing and clean-transfer areas;
- compressed-air quality control;
- short cleaning-to-coating waiting time;
- dust- and damage-resistant packaging;
- renewed cleanliness confirmation after rework.
16. Different cleaning targets before anodizing, painting, plating and PVD
| Downstream process | Main cleaning target |
|---|---|
| Anodizing | No oil or compound and uniform substrate reaction |
| Painting | Prevent craters, fisheyes and adhesion failure |
| E-coating | Continuous pretreatment without local contamination |
| Plating | Strict control of oil, compound, particles and substrate defects |
| PVD | Low residue, no fingerprints, low volatile contamination, flat base |
| Laser marking | No oil film or local contamination |
| Direct assembly | No particles, trapped liquid, fingerprints or foreign material |
Cleaning standards should be defined backward from the final process.
17. How to verify cleanliness
Depending on the product and downstream process, combine:
- defined-light visual inspection;
- water-break continuity;
- material-compatible surface-cleanliness checks;
- white-cloth or wipe checks;
- trapped-liquid checks;
- post-dry water-mark inspection;
- particle and foreign-material inspection;
- gloss comparison before and after cleaning;
- anodizing, painting, plating or PVD trials;
- assembly cleanliness;
- batch and bath-state traceability.
One simple test is not sufficient proof for every contamination type.
18. Prototype-to-production cleaning validation
Recommended route:
identify material and contamination
→ select compound removal, degreasing and physical action
→ confirm material and gloss change on trials
→ verify grooves and blind holes
→ verify rinsing and drying
→ validate the final surface treatment
→ validate basket and load
→ validate bath contamination and cycle on a pilot lot
→ freeze parameters and bath-change rules
→ establish cleanliness and limit samples
Trials should include difficult orientations, cavities, load positions and maximum waiting time rather than only one easy-to-clean part.
19. Common failures and corrective direction
| Failure | Main cause | Corrective direction |
|---|---|---|
| Compound film remains | Inadequate compound removal or hardened compound | Add pretreatment and matched chemistry |
| White residue in holes | Inadequate rinse and trapped liquid | Directed flushing, drainage and final rinse |
| Gray appearance | Aggressive chemistry, temperature or time | Re-establish material-compatible window |
| Water marks after drying | Water quality, drainage or drying | Improve final rinse, blow-off and drying |
| Particles remain after ultrasonics | Shadowing or dirty bath | Adjust orientation, load and filtration |
| Mottling after anodizing | Oil, compound or cleaner residue | Improve rinse and validate water break |
| Coating craters | Oil, compound or silicone contamination | Trace polishing and handling contamination |
| Local PVD defects | Fingerprints, volatiles or fine residue | Improve clean handling and precision cleaning |
| Inconsistent batch result | Basket position and bath drift | Control load, concentration and bath change |
| Recontamination after cleaning | Dirty glove, fixture or package | Establish clean transfer and packaging |
20. Why cleaning must be managed with adjacent processes
Cleaning problems often originate in polishing and appear only during the next coating.
The complete chain is:
CNC and forming control the substrate
→ robotic, buffing, centrifugal or plasma-electrolytic polishing
→ identify compound, abrasive, oil and electrolyte
→ material-compatible precision cleaning
→ rinse, dry and prevent recontamination
→ anodizing, painting, plating or PVD
→ verify appearance and adhesion
Fragmenting polishing, cleaning and coating among unrelated suppliers makes contamination sources harder to identify and increases responsibility disputes and rework.
21. RFQ information
| RFQ input | Engineering use |
|---|---|
| Material grade | Select compatible chemistry and temperature |
| Incoming process | Identify oil, compound, abrasive and electrolyte |
| Controlled 2D drawing and 3D model | Identify blind holes, grooves and drainage |
| Class-A surfaces | Control damage, fingerprints and water marks |
| Final surface treatment | Define cleanliness backward |
| Gloss and texture | Evaluate possible cleaning-related change |
| Restricted cleaner list | Meet material and customer limits |
| Internal-residue requirement | Design spray, ultrasonic and blow-off |
| Particle and cleanliness requirement | Select verification method |
| Batch and cycle | Select batch or single-part cleaning |
| Packaging and waiting time | Prevent recontamination |
| Limit samples | Align water-mark, gray and residue acceptance |
Before quotation, confirm:
- whether the prior process is robotic grinding, buffing, centrifugal finishing or plasma electrolytic polishing;
- the main contamination;
- whether the material permits alkaline, acidic or specific solvent systems;
- the hardest cavities to drain;
- whether slight gloss change is permitted;
- whether the next operation is anodizing, painting, plating, PVD or assembly;
- whether parts may contact during batch cleaning;
- whether dedicated baskets are required;
- maximum waiting time after cleaning;
- the method used to accept cleanliness.
Frequently asked questions
Can ultrasonic cleaning completely remove buffing compound?
Not reliably by itself. Thick compound, heat-hardened films and material trapped in grooves or rough surfaces normally need a material-compatible compound-removal or degreasing step to soften, emulsify or disperse them before ultrasonics, spray, brushing and thorough rinsing carry the contamination away. Increasing ultrasonic time alone can still leave a film or cause redeposition.
Why is a pure-water rinse still required after chemical cleaning?
Cleaner, surfactant and dispersed contamination can remain on the surface or in cavities and can contaminate downstream tanks. Multi-stage rinsing and a pure-water final rinse reduce chemical carryover, drying residue and water marks and provide a more stable surface for anodizing, painting, plating or PVD.
Why can polished aluminum turn gray or lose gloss during cleaning?
Common causes include chemistry that is too alkaline or acidic, excessive temperature or time, incompatibility with the alloy and polished surface, insufficient rinsing or unsuitable drying. Concentration, temperature, time, ultrasonic action and rinsing must be re-established for the actual alloy, base finish and final appearance instead of simply making the cleaning more aggressive.
How should batch cleaning and single-part cleaning be selected?
Batch cleaning offers high throughput and cost efficiency for similar parts and stable volumes. Single-part or directed-spray cleaning makes it easier to control complex cavities, critical class-A surfaces and conditions for each component. Selection must also consider part-on-part damage, basket shadowing, blind-hole drainage, product changeover, cycle time and downstream cleanliness.